Mining crypto currencies such as Ethereum without specialized hardware such as ASICs is still possible with powerful video cards, or GPUs. No-one know for how long this will continue, and for how long the return on investment in hardware and cost of electricity will continue to be attractive enough, or how soon the current top GPUs become obsolete in this business. That is the main risk.
The main steps towards being a miner are as follows:
[ ] Learn how things work
[ ] Build a mining rig
[ ] Install mining software
[ ] Select a mining pool
[ ] Get a digital wallet or account
[ ] Run and maintain your operations
[ ] Pay your taxes
But first some basic knowledge to get up to speed:
Need To Know
- Profitability of mining crypto-currencies can change quickly for better or worse. Do not commit to long contracts. Do not assume you will have many months to recover your hardware investment.
- When mining is profitable, hardware prices can go up significantly or hardware can become impossible to obtain at reasonable prices.
- Read our other post about “The strange wonderful world of Bitcoin” if you need some crypto-currency background.
- Crypto-currencies generally require a distributed community of “miners” to keep adding transactions to the digital ledger, the blockchain.
- Mining sets currency transactions into stone by using computing power. This involves solving complex mathematical riddles which require brute-force solving solving. This is Proof of Work mining.
- Some currencies, including Ethereum, will be moving to Proof of Stake mining which operates quite differently and does not require as much computing power. This article applies to PoW mining.
- Mining is very hard and similar to a lottery. Therefore, miners benefit from pooling their efforts into mining pools and sharing fairly the rewards. The shared effort make distributions smaller but more regular.
- Mining a block pays newly minted coins, plus the transaction fees of the transactions included into the block. Pools typically keep a fee, such as 1% for their work to keep it all running and to keep hackers out.
- The mining proceeds are held by a pool until a certain threshold amount is reached, at which time the proceeds will be paid out. The account number is your wallet address for each currency. Choose reliable and trusted pools only.
- To make more than tens of dollars per month, you will need several video cards and a meaningful mining performance, which is expressed in hashes per second (e.g. H/s), or also solutions per second (Sols/s.)
- Calculators exist to estimate the net profit from mining certain coin assuming certain hash rate, power consumption, and your power cost. This calculation also involves the so called difficulty, which depends on the total hash rate available globally for mining each coin. The USD profit finally depends on the exchange rate
- The days of mining on a CPU are over (but things may change with newer coins though). GPU graphics card will work great for many coins.
- Hardware must be as cheap as possible for faster return in capital, typically with a cheap CPU, a few GB of RAM, but as many PCI-e slots on the board as possible to connect as many GPUs as possible. The GPU must be selected considering performance per Watt, and per GPU card $.
- AMD GPUs are known to be very cost effective, and therefore mainstream. However, we consider Nvidia CUDA GPUs instead as they are easier to obtain at reasonable prices (and are more suitable for other projects such as deep learning.)
- Fire-safety must be considered, as well as Amp ratings of wiring and outlets.
- The power supply (PSU) needs to support the setup with margin. People use as a rule of thumb 3/4 or 80% of the specified power as a limit.
- Cooling will be needed badly in summer months. Some claim 40% of power must be added in the calculation to account for cooling cost. But in winter that turns into free heating. Overheating GPUs will fail prematurely. GPU fans tend to be quiet but the PSU fan can be quite noisy.
- Practically you will need a space that is relatively fire-safe, that is cooled, and that preferably has an exhaust fan. Not a closet, but something like a bathroom.
- Mining software is easy to get and can be free, or cost you one or two percent of your mining proceeds.
- There is no need to run a full node synchronizing the block chain when mining in a pool. Spare yourself the effort and the extra network traffic.
- Finally, the IRS considers mining as self-employment, subject to self-employment taxes. There is a dollar threshold of only a few hundred dollars, for when this officially becomes self-employment. You are responsible to consider the details.
Building a Mining Rig
GPU cards have hundreds, sometimes thousands of processor cores, and with extremely high bandwidth memory access to on-board memory GPUs are great for doing a lot of computations. We will build a low-cost mining rig with 6 cards, in a crate.
(Note: Half a year later after publishing the first version of this post, it was clear that the rig described here, like most other open rigs, have some limitations such as limited filtering of dust, serviceability, mechanical stability, and reliability. As of December I have completed the switch to refurbished/used enterprise grade workstations with fewer GPUs per unit, trading compactness and low cost for longer-term reliability, and maybe better preservation of hardware value. But for maximizing mining profit only, the rig works great.)
Shopping (Mid-June 2017)
Generally, the memory requirements are increasing, and today you will need 4GB at minimum to play the game. This is because to work on the mathematical problem, a new data structure is generated periodically, every 30,000 blocks for Ether, which must fit into GPU memory. This structure is called the DAG, and grows slowly over time. Generation of the DAG is very fast and not a concern.
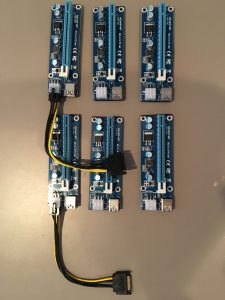
Many motherboards support 5 GPUs, but only a few 6 or 7 out of the box. Some boards have the PCI-e slots but do not work well with all of these filled. Further, the cards are not plugged into the board, but connected via riser cards, to provide separate power supplies directly from the power supply (PSU), and to space the cards for better cooling. Finding quality riser boards is not easy, but look at the reviews.
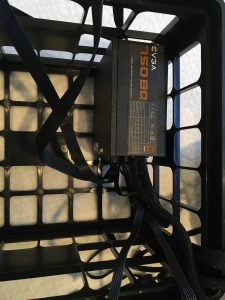
Our rig will live in a plastic crate, about $5 from the hardware store. Some Cable ties will come handy for tying things down so buy at least 15, 8in. ties when you buy your crate. We could find all other parts at Newegg and Amazon. Since everything else was out of stock, we use the EVGA GeForce GTX 1050 Ti. This turned out rather well because the cards only consume 60W (rated 75W,) operate typically well below 82C, and without any tuning gave us about 75MH/s total for six cards, at total system power of 388W. The cards were priced OK too, around $140 per card.
The motherboard was a Biostar TB85 with an Intel LGA 1150 CPU socket and 6 PCIe slots, because the Biostar TB250-BTC with Intel LGA 1151 CPU socket sold out while looking. Great boards for only $85. The CPU could be a Celeron G1840 for $50. The risers were about $70 for 6, and 4GB RAM was about $20. The EVGA 750W 80 PLUS BRONZE PSU was $55 refurbished. Some storage will be needed for the OS, perhaps use a cheap SSD.
$85 Motherboard
$50 CPU
$20 RAM
$70 risers
$840 6x GPU
$55 refurbished PSU
$10 crate and ties
$50 SATA 120G SSD
===================
$1,180 total BOM cost
Construction
While the crate in the photo looks like a bunch of hardware dumped in into a crate, it is a great working system. Here are the steps.
The PSU will appears dead when just plugged in and switch turned on but don’t return it to the store yet, because it is activated via the motherboard. Also, for your convenience, wait with installation of the GPU cards until after initial configuration of the BIOS and default display output.
[ ] Place the power supply (PSU) in a corner of the crate
Power socket and switch should be accessible from the outside
[ ] Use a few ties in series to tie the PSU to the crate
[ ] Install CPU, cooling fan, and memory on the motherboard
[ ] Place the riser card connectors into the PCIe slots
[ ] Place the motherboard in the crate on antistatic mat
[ ] Connect the PSU cables to PSU and motherboard (main connector plus CPU connector)
[ ] Connect 2xVGA power cables and 2xSATA power cables to PSU
[ ] Connect USB cables for riser boards to connectors plugged into PCIe slots
[ ] Connect two SATA power to 6 pin power plug conversion cables to two riser boards
[ ] Optionally connect power on switch to motherboard
Alternatively note the location of the pins to short to start the system. You will need some dexterity to do this when the board is installed. It can be done.
[ ] Connect a SATA cable to the board and connect to SSD drive
[ ] Connect SSD drive to power
[ ] Tilt motherboard up  to make it stand upright and fix it with ties
[ ] Connect display and keyboard and configure BIOS (see below)
[ ] Ensure switching power off and restoring power results in system booting
[ ] Connect network cable to router and connect a CD-ROM drive via USB
[ ] Install Ubuntu OS
[ ] Install GPU cards as shown into crate with loose ties
[ ] Connect GPU power supply cables, and USB cables and tighten ties
[ ] Install drivers, mining software and finish up software setup
Speaking from experience: Avoid using SATA to 6-pin connector cables (shown in the photos below) to supply power to the riser cards. SATA connectors are not suitable for handling high currents to even lower power GPUs, and may sooner or later become hot and melt.
Watch out for metal parts touching leading to potential shorts or static discharge, and watch for cables and parts getting into moving parts such as fans on the board or on the GPUs. It is not too hard to avoid.
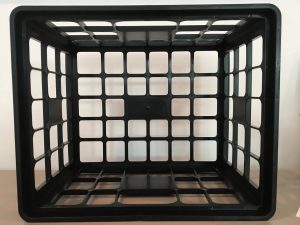
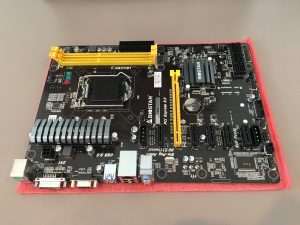
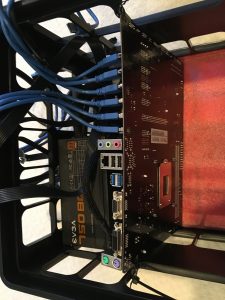
The crate as super-cheap PC enclosure, and a BiosStar TB85 motherboard with 6 PCIe slots.
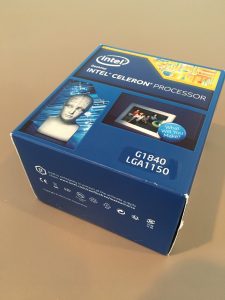
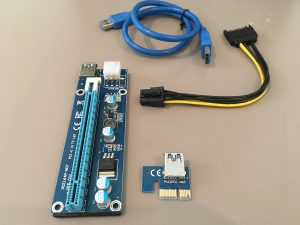
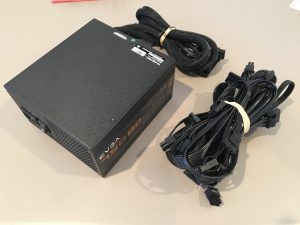
A cheap Celeron CPU, a riser board with cables, and 750W power supply with cables.
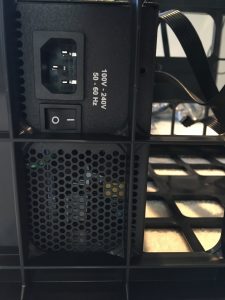
Placement of the PSU, nicely accessible from outside the crate, and prepared six riser boards.
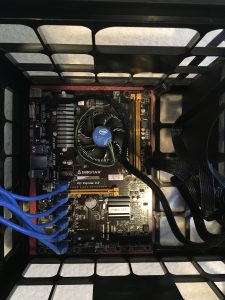
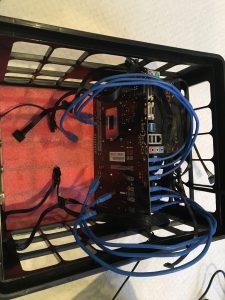
Motherboard initial position, then tilted upright and tied on both sides to the crate. Note the cabling layout.
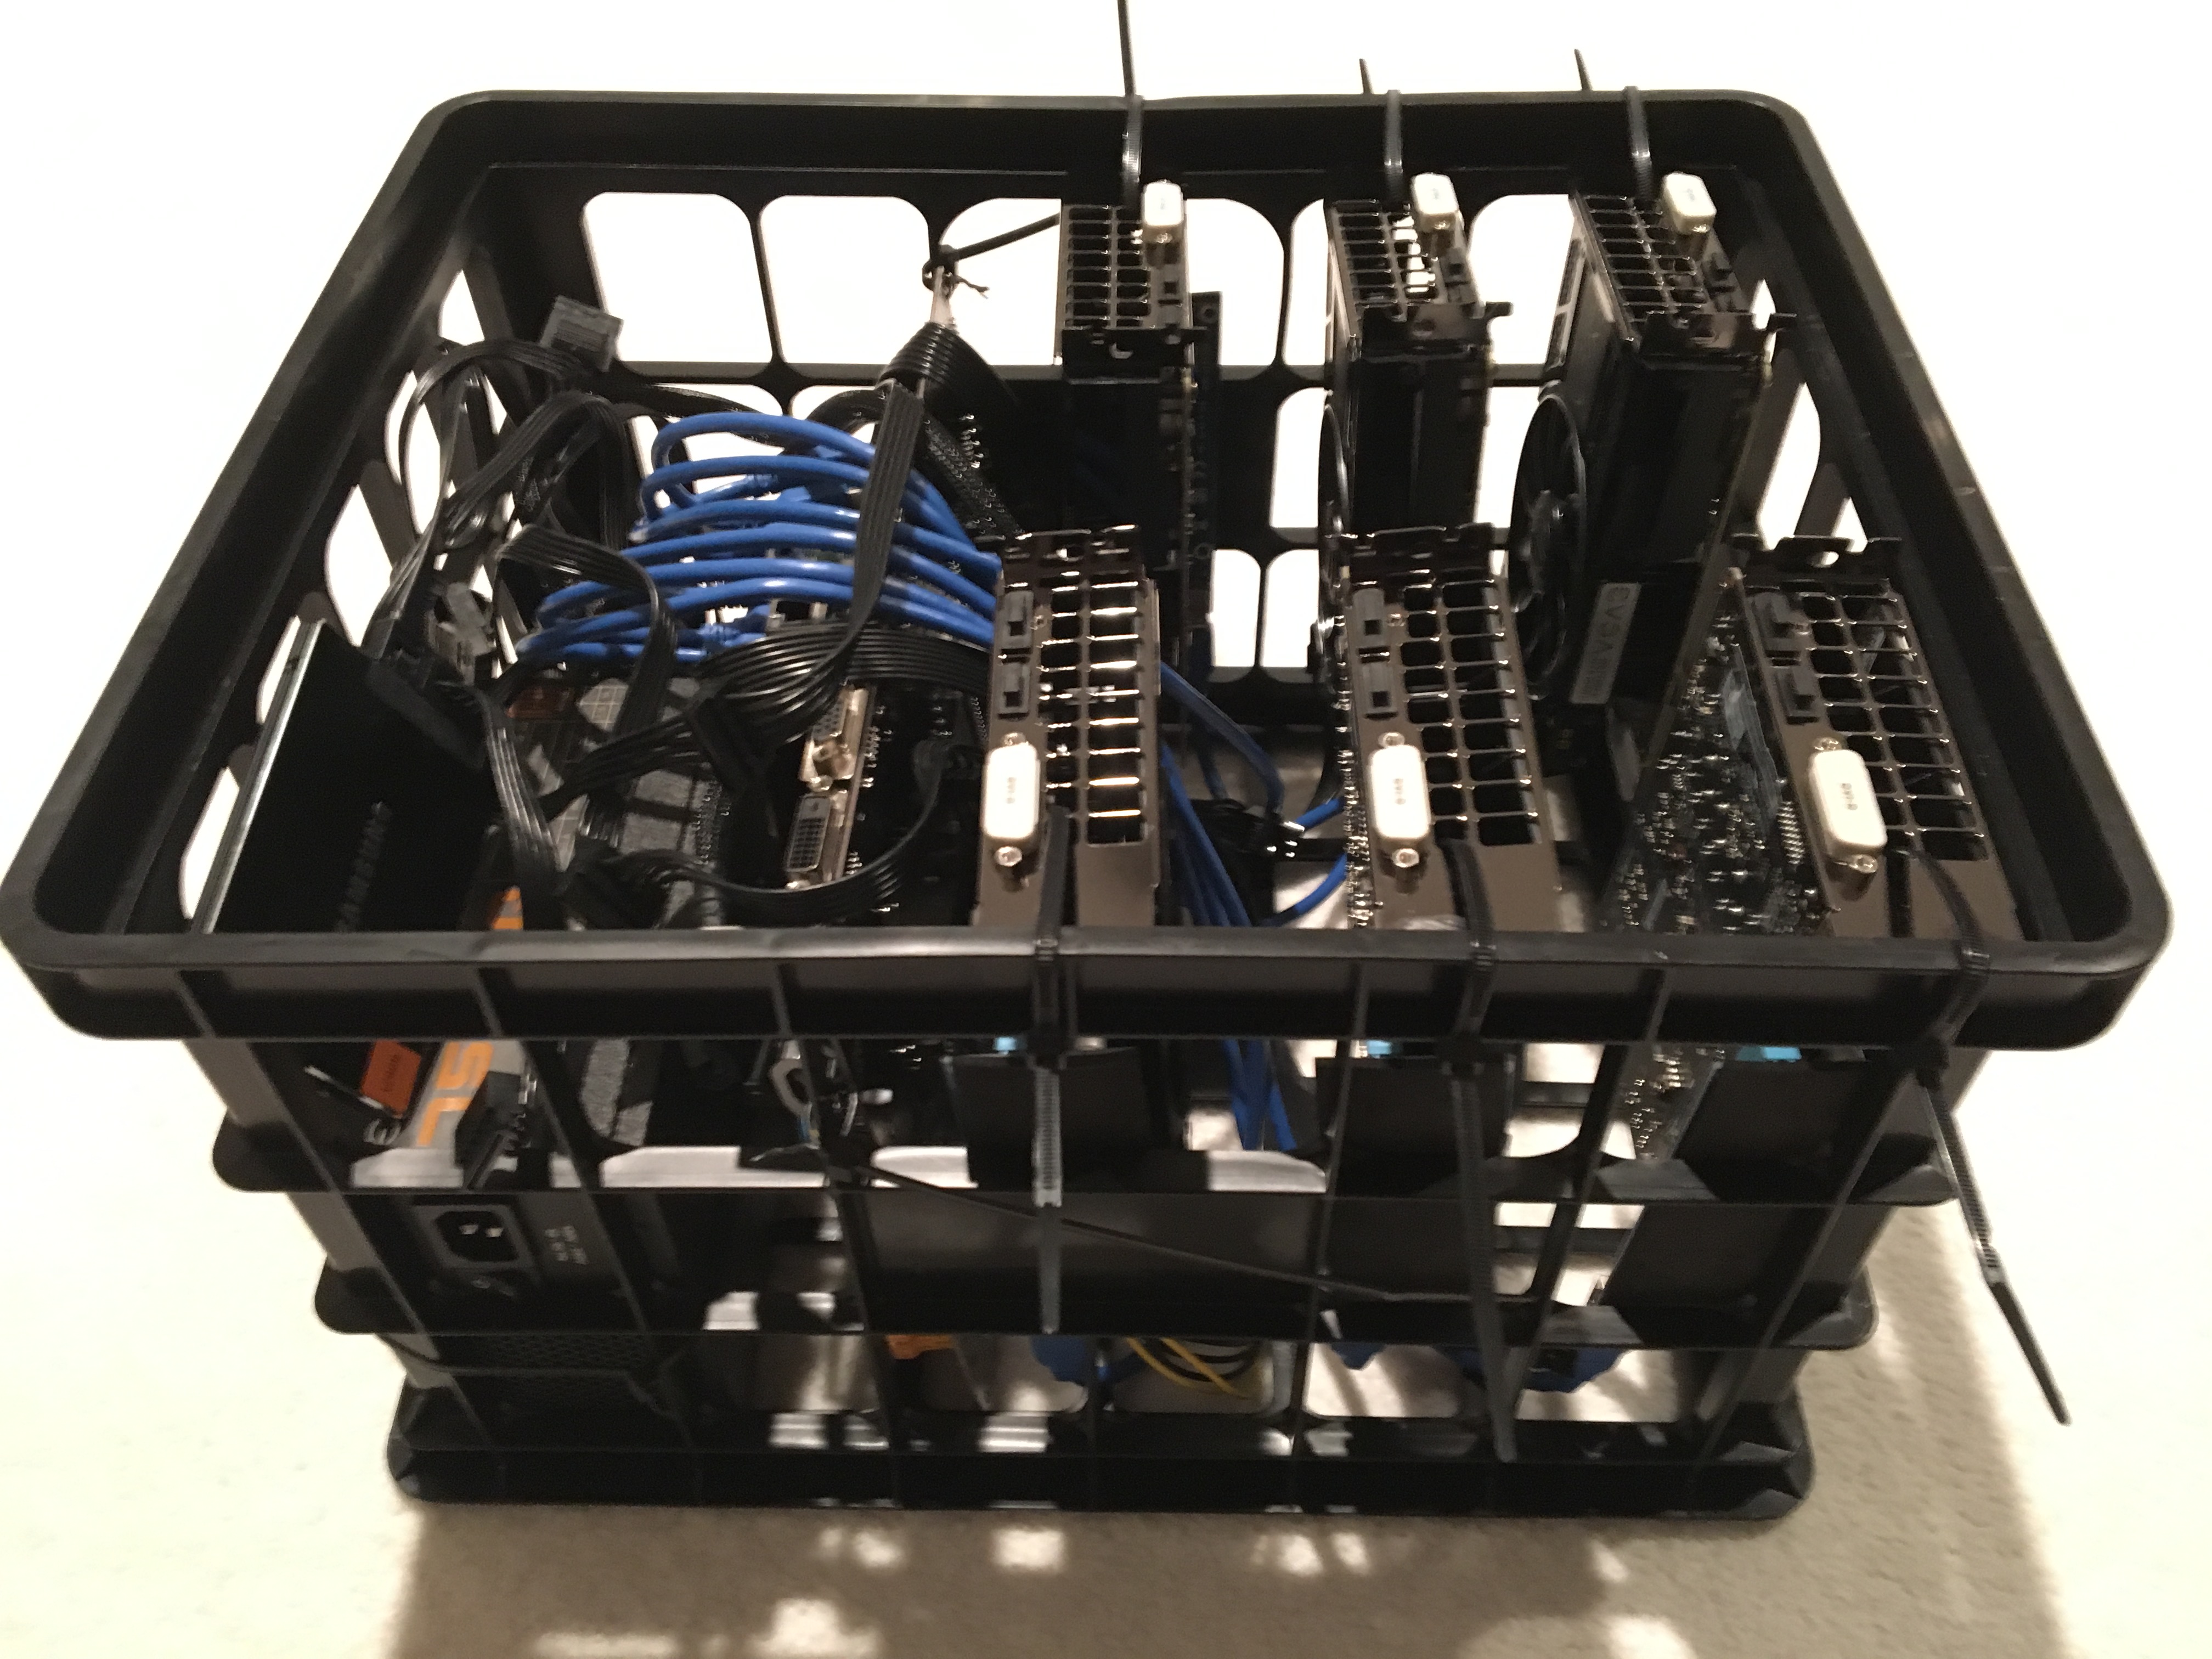
The final product – a work of art. Just cut off the ties and your easily portable rig is ready for mining.
Software Installation
The major steps are as follows:
[ ] Configure the BIOS
[ ] Install Ubuntu 16.04 LTS server
[ ] Update the system and make it remotely accessible
[ ] Install drivers
[ ] Install mining software
[ ] Create a start-up script
[ ] Configure automatic execution at boot
BIOS configuration
The happy thing of the selected motherboard is that everything runs out of the box with 6 GPUs. No need for BIOS updates and such. To start your system you need to short two pins on the motherboard, or you could connect and use a switch for $7 from Amazon. Refer to the motherboard manual. We want to make sure that you need to do this once and only once, to start the system for the first time, by configuring the BIOS.
[ ] Boot system without GPUs connected and with a display connected to on-board video
[ ] Restore the default settings if the board is not new
[ ] Set the time and date
[ ] Set the system to power on after loss of power
[ ] Set on-board internal graphics as primary video output (Chipset-SystemAgent-IGFX)
The rig is ready and should power on as soon as you turn on the power switch on the power supply. (After a shutdown of the system you may have to turn off the power switch and wait for the capacitors to discharge before turning on the power.) Eventually you will not need the display and keyboard anymore.
If you can, setup DHCP on your router to allocate always the same IP address to the MAC address of the rig.
Ubuntu 16.04 LTS Server Installation
[ ] Burn an installation DVD
[ ] Attach a DVD drive via USB, and Ethernet and boot
[ ] Partition the hard drive as you wish and start installation
[ ] When asked about updates select automatic security updates only
[ ] When asked for software to install, add OpenSSH
[ ] When done, reboot and turn off the power
[ ] Install the GPU cards
[ ] Turn on power to boot the system
Confirm you can log in at the prompt. The following was tested with Ubuntu 16.04.2 on the hardware listed earlier.
Configuration of the system
Try logging in remotely from your regular laptop using a terminal. You may need to find the IP address allocated to it.
[ ] Login from the console on the rig
[ ] Find your IP address with one of the following
ifconfig -a
ip addr
If there is no address, and you cannot successfully ping 8.8.8.8 (Google DNS) for instance try ifconfig <interface> up. If that does not get you an IPv4 address try obtaining if via from your DHCP server using sudo dhclient <interface>. Next make sure that in /etc/network/interfaces the interface is correctly listed. It should include auto <interface>, face <interface> inet dhcp. if not, edit the file with sudo /etc/network/interfaces.
[ ] Remote login from your laptop terminal window: ssh <ip address>
[ ] Accept the new host by entering yes
[ ] Login with your password
Now reboot with sudo reboot and test if Ethernet is working by logging in and trying ping 8.8.8.8. If successful you can power down the system by switching off power, and disconnect display, keyboard and move the rig to a permanent location.
[ ] Update software list and upgrade
sudo apt update
sudo apt -y upgrade
GPU CUDA drivers installation
The latest drivers can be downloaded from NVDIA here. We use wget to download the CUDA 8.0 Toolkit for 64-bit CPUs and Ubuntu Debian (deb) package to our rig. The download may take a while as it is 1.78G. The following was tested on July 1, 2017, without the June 26 2017 patch.
(Note: This procedure also worked with the CUDA 9.0 toolkit (cuda-repo-ubuntu1604-9-0-local-rc_9.0.103-1_amd64.deb) which is available for download if you sign up for the free Nvidia developer program. You need to make the appropriate changes to the commands below, such as changing 8.0 to 9.0 etc.)
(Do not install if you do not have an NVIDIA GPU installed. Also note that older CUDA GPUs are not supported anymore by the more recent drivers and CUDA toolkits.)
[ ] Download the relevant package from NVIDIA
wget https://developer.nvidia.com/compute/cuda/8.0/Prod2/local_installers/cuda-repo-ubuntu1604-8-0-local-ga2_8.0.61-1_amd64-deb
[ ] Setup as local repository
sudo dpkg -i cuda-repo-ubuntu1604-8-0-local-ga2_8.0.61-1_amd64-deb
[ ] Optionally clean out old cuda stuff
sudo apt purge nvidia-cuda*
[ ] Update and install cuda
sudo apt update
sudo apt install -y cuda
The installation will take a long time but will be rewarded with this after entering nvidia-smi. This command is useful to check on your cards and their temperatures. Some claim 80C should not be exceeded to extend the life of your card, but Nvidia may be designing to 110C max.
$ nvidia-smi
Sat Jul 1 00:00:00 2017
+-----------------------------------------------------------------------------+
| NVIDIA-SMI 375.66 Driver Version: 375.66                                    |
|-------------------------------+----------------------+----------------------+
| GPU Name Persistence-M        | Bus-Id Disp.A        | Volatile Uncorr. ECC |
| Fan Temp Perf Pwr:Usage/Cap   | Memory-Usage         | GPU-Util Compute M.  | |===============================+======================+======================|
| 0 GeForce GTX 105... Off      | 0000:01:00.0 Off     | N/A                  |
| 30% 37C P0 35W / 75W          | 0MiB / 4038MiB       | 0% Default           |
+-------------------------------+----------------------+----------------------+
| 1 GeForce GTX 105... Off      | 0000:02:00.0 Off     | N/A                  |
| 30% 36C P0 35W / 75W          | 0MiB / 4038MiB       | 0% Default           |
+-------------------------------+----------------------+----------------------+
| 2 GeForce GTX 105... Off      | 0000:03:00.0 Off     | N/A                  |
| 30% 33C P0 35W / 75W          | 0MiB / 4038MiB       | 0% Default           |
+-------------------------------+----------------------+----------------------+
| 3 GeForce GTX 105... Off      | 0000:04:00.0 Off     | N/A                  |
| 30% 35C P0 35W / 75W          | 0MiB / 4038MiB       | 0% Default           |
+-------------------------------+----------------------+----------------------+
| 4 GeForce GTX 105... Off      | 0000:05:00.0 Off     | N/A                  |
| 30% 33C P0 35W / 75W          | 0MiB / 4038MiB       | 0% Default           |
+-------------------------------+----------------------+----------------------+
| 5 GeForce GTX 105... Off      | 0000:06:00.0 Off     | N/A                  |
| 30% 35C P0 35W / 75W          | 0MiB / 4038MiB       | 0% Default           |
+-------------------------------+----------------------+----------------------+
+-----------------------------------------------------------------------------+
| Processes: GPU Memory                                                       |
| GPU PID Type Process name Usage                                             | |=============================================================================|
| No running processes found                                                  |
+-----------------------------------------------------------------------------+
Mining software installation
We pick a great version of ethminer for our mining on CUDA cards. Ethminer was forked and developed by Gitoil (cpp-ethmine) and forked again by chfast here. The latest version performs better by a significant 5% so it is worth replacing prior versions. This compiled with version ethminer 0.12.0.dev2.
[ ] Clone the repository
git clone --recursive https://github.com/ethereum-mining/ethminer.git
[ ] Export the required path variables
export PATH=/usr/local/cuda-8.0/bin${PATH:+:${PATH}}
export LD_LIBRARY_PATH=/usr/local/cuda-8.0/lib64${LD_LIBRARY_PATH:+:${LD_LIBRARY_PATH}}
[ ] Ensure you have cmake
sudo apt install -y cmake
[ ] Build the executable
cd ethminer
mkdir build; cd build
sudo cmake -DETHASHCUDA=ON -DETHASHCL=OFF ..
#Note that DETHASHCL=OFF can be left out for OpenCL support. The first switch selects CUDA support. Get some coffee as building takes a while.
[ ] You may need to install the dev version of libidn11
sudo apt install -y libidn11-dev
[ ] Finally build
sudo cmake --build .
The miner program will be in ~/ethminer/build/ethminer and is named ethminer. We are almost there!
Testing the miner and learn about Screen
[ ] Change directory to ~/ethminer/build/ethminer
cd ~/ethminer/build/ethminer
[ ] Check the version (gave 0.11.0.dev0 at the time of this writing)
./ethminer --version
[ ] Run a test of the speed
./ethminer -M -U
The rig did 75 MH/s out of the box using six Nvidia 1050 Ti GPUs and ethminer 0.11.0. Another configuration with two 1050 Ti and two 1070 GPUs tested with ethminer 0.12.0.dev2 did 78 MH/s. (The 1070 has a similar power efficiency and power consumption as a pair of 1050 Tis, but the price is currently three times the price of a 1050 Ti so the 1050 Ti remains my favorite CUDA card for mining.)
Screen is a utility to make managing ssh sessions very easy even after a network disconnect. If it is not installed already (it should be) then install it:
sudo apt-get install screen
Quick user guide: Activate it by typing screen. To create a clean new session press <Ctrl><c>. To switch to the next session use <Ctrl><n> and type exit to exit and destroy a session. Use screen -r to re-connect to an open session, or list available sessions. That is what you do after re-connecting from a remote terminal with an ssh session.
Configuration of a mining startup script
You should have an Ethereum wallet and address and select a mining pool. The following works with nano pool.org. Perform the following on your top user directory. ~/
In the following you must replace your own login id in place of “youruserid”.
[ ] vi startmining
[ ] Enter:
#!/bin/bash
DEFAULT_DELAY=0
if [ "x$1" = "x" -o "x$1" = "xnone" ]; then
 DELAY=$DEFAULT_DELAY
else
 DELAY=$1
fi
sleep $DELAY
# The following starts the mining operation on specified GPU cards
echo "Attempting to start screen and ethminer"
/usr/bin/screen -dmS ethm2 /home/youruserid/ethminer/build/ethminer/ethminer --cuda-devices 0 1 2 3 4 5 --farm-recheck 200 -U -S eth-us-east1.nanopool.org:9999 -FS eth-us-west1.nanopool.org:9999 -O 0xda000d0000DDd0D00d0000D0D0dDd0d0D0d00ddD.yourrigname/your@emailaddress
echo "Done."
[ ] Key in: <Esc>:wq<Enter> to save and exit editor
[ ] sudo chmod +x startmining
Next add a line before exit(0) in /etc/rc.local to run the script at boot:
[ ] sudo vi /etc/rc.local
[ ] Add:
/bin/su youruserid -l -c "/home/youruserid/miningstart 15 &"
[ ] Key in: <Esc>:wq<Enter>
Now you can try to see if it works. Reboot the system and keep your fingers crossed: sudo reboot
After reboot is complete connect via ssh and type screen -r to see the output of ethminer.
In case of trouble, you will need to get to the terminal on the main console using attached keyboard and screen, and typing <Ctrl><Alt><F1>. Login and check networking, and check for the ethminer process with ps -A | grep ethminer
Test the portion of the script from /home/youruserid/… from the command line to test the ethminer command. The part before it starts screen and give the screen a name.
The output of ethminer shows the following when it finds a solution, and when it is accepted as valid by the pool:
"Solution found; Submitting to eth-us-east1.nanopool.org ...
Nonce: 0x00dd0000000dddd0
stratum  B-) Submitted and accepted.
 #0d00d000 : 78.64MH/s [A1233+0:R0+0:F0]
The more typical output shows the hash rate, number of accepted solutions so far, and number of rejected solutions: #0d00d000 : 75.00MH/s [A123+0:R0+0:F0]
Happy mining.
Enhancements
You probably will want to change the GPU fan speeds to improve cooling. Read how to do that here. We also have a post on thermal management here.
As of January 2018: If you want something more stylish, easier to maintain, read a newer post here. It covers CUDA 9.1 on CentOS 7.4.
updated: 20170629, 20170701; 20170708; 20170729; 20170808; 20170828; 20171009; 20171212; 20180129